How do you blend oil pastels?
Short answer
Blending oil pastels involves using physical pressure, solvents, or tools to merge colors on a surface. You can use your fingers, stumps, or brushes to smear pigments together for smooth transitions. Applying light layers, using colorless blenders, or utilizing mineral spirits allows for professional-grade gradients and complex color depth in your artwork.
On this page
How to blend oil pastels with tools
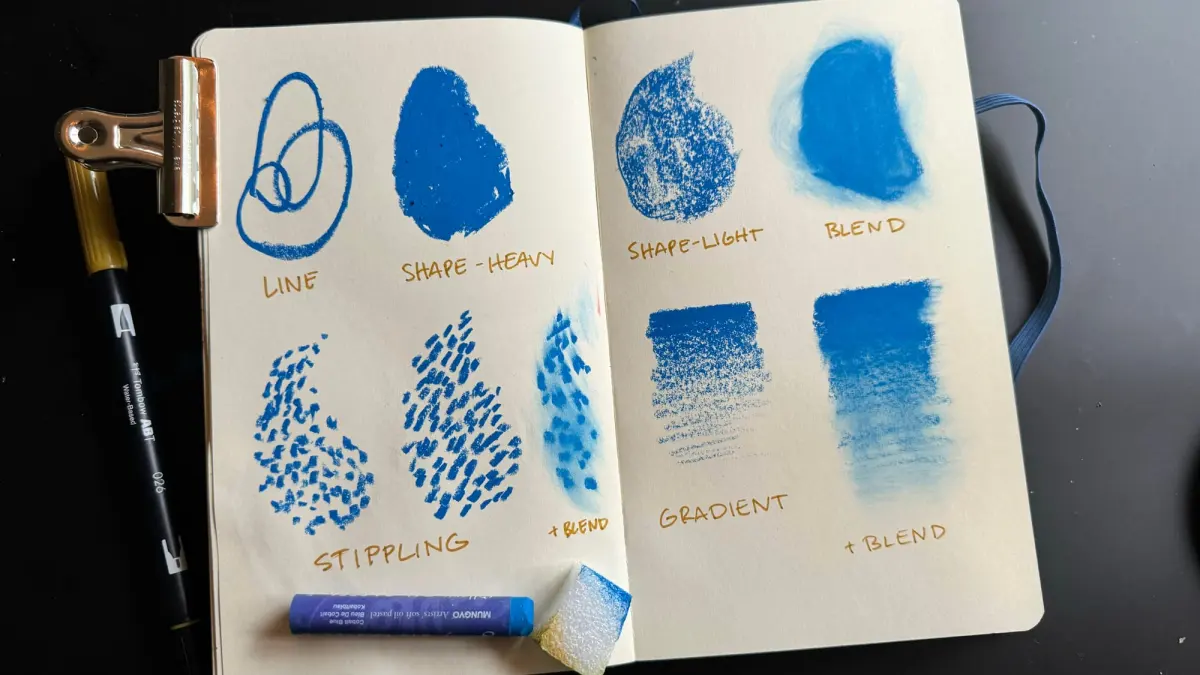
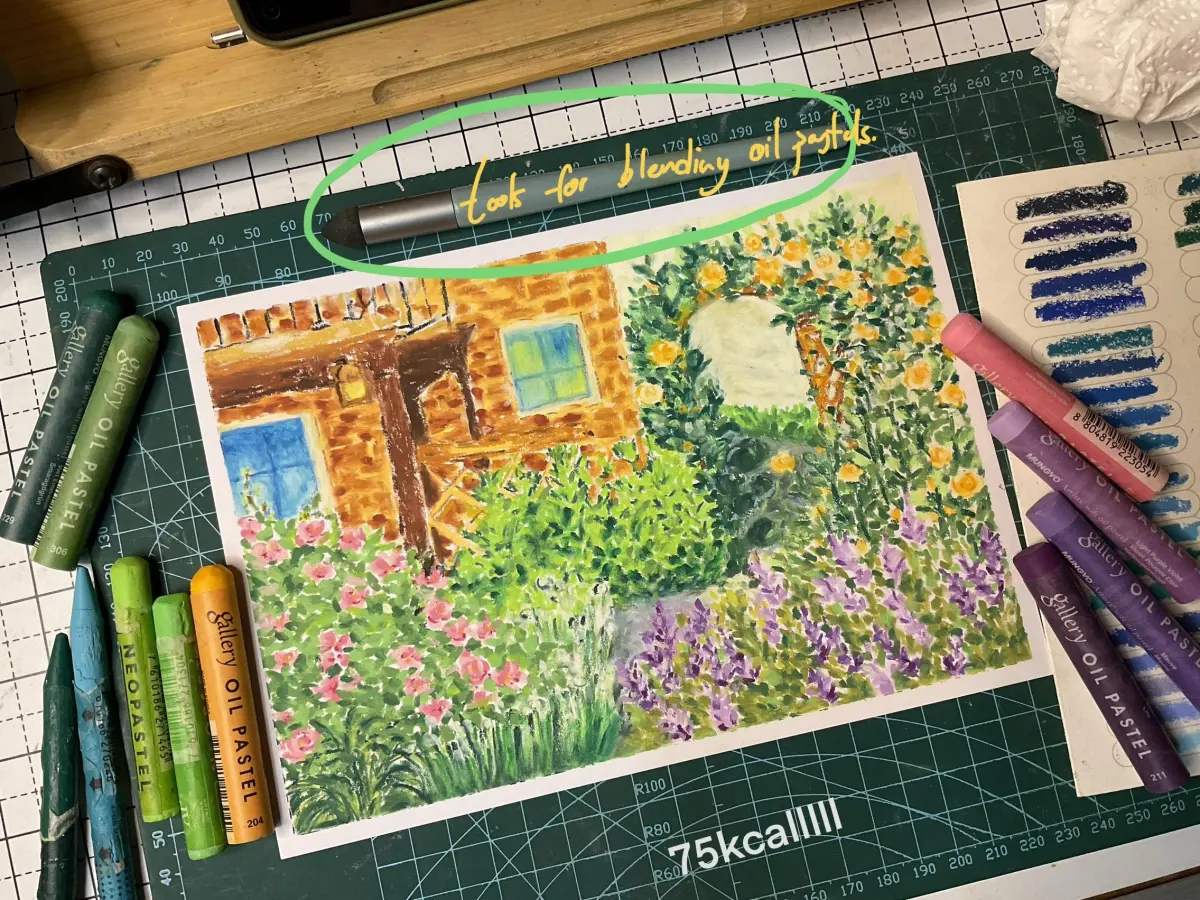
Physical blending is the most common technique for artists working with oil pastels. Because these sticks contain non-drying oil and wax binders, they remain malleable long after application. You can use your fingers for a soft, organic look, but oils from your skin may affect the long-term archival quality of the paper. Instead, many professionals prefer specialized tools that offer more control without transferring skin oils to the surface.
- Use a paper stump or tortillon to push pigment into the tooth of the paper.
- Employ a silicone color shaper for precise edges and firm, controlled blending.
- Utilize a stiff-bristled brush to buff colors together, creating a painterly, textured effect.
- Experiment with a palette knife to scrape and redistribute thick layers of color.
These tools allow you to transition between colors without muddying the pigments. Always start with the lightest color first to prevent darker shades from overwhelming your composition during the blending process.
Which solvents work best for blending
Solvents are essential when you want to achieve a fluid, paint-like consistency. Mineral spirits, such as odorless turpentine or refined linseed oil, are the industry standards for dissolving the wax binder. When you apply a small amount of solvent to your drawing, the oil pastel softens instantly, allowing you to move the pigment across the surface with a brush. This technique mimics the appearance of oil painting while retaining the bold, graphic characteristics of pastels.
- Odorless mineral spirits: The most effective solvent for thinning and smoothing large areas.
- Refined linseed oil: Adds a glossy finish and extends the drying time of the pastel.
- Baby oil: A non-toxic alternative that works well for small, delicate blending tasks.
- Turpenoid: A popular, less aggressive solvent preferred by artists working in home studios.
Use these substances sparingly. Too much liquid can saturate the paper, causing it to warp or the pigment to lose its structural integrity.
How to layer colors for smooth gradients
Layering is the foundation of successful blending. Rather than trying to force two colors together immediately, apply them in overlapping strokes. By leaving small gaps of the underlying paper visible, you create optical depth. As you add more layers, the wax-based pigments begin to interlock. This mechanical interlocking is what creates the rich, saturated look characteristic of professional oil pastel work.
To create a seamless gradient, follow these steps:
- Apply the first color with light pressure, leaving space for the transition.
- Apply the second color, slightly overlapping the edge of the first.
- Use a colorless blender stick or a clean finger to rub the overlap zone.
- Re-apply the initial colors over the blended area to refine the intensity and hue.
If the surface becomes too slick to accept more pigment, you have reached the "saturation point." At this stage, you must either scrape away excess material or use a solvent to reactivate the layer.
Why oil pastel blending becomes muddy
Muddy colors occur when you overwork the surface or mix too many complementary colors together without a plan. Because oil pastels are opaque, they do not behave like watercolors, which rely on transparency. When you blend blue and orange, for example, the physical mixing creates a neutral brown or gray. If you continue to scrub the surface, the colors lose their vibrancy and turn into a dull, flat sludge that lacks definition.
To avoid this common issue, keep your blending strokes intentional and brief. If you notice the colors starting to look gray, stop immediately and clean your tool. You can also use a "scraffito" technique to scratch back into the muddy area, revealing the brighter colors underneath. This adds texture and restores the visual energy of the piece. Always wipe your blending tool on a paper towel between every single stroke to ensure you are not carrying unwanted pigment across the drawing.
Common mistakes when blending oil pastels
Many beginners struggle because they apply too much pressure too quickly. Heavy-handed application fills the paper's tooth instantly, leaving no room for subsequent layers or blending. This results in a waxy, uneven surface that resists further manipulation. Another frequent error is using the wrong paper; smooth printer paper lacks the texture—or "tooth"—required to grip the pastel, making it nearly impossible to achieve a smooth, professional blend.
- Avoid using glossy or slick paper, which prevents the pigment from adhering.
- Do not use your fingers if you intend to preserve the work for many years.
- Never mix too many colors at once, as this inevitably leads to a muddy appearance.
- Avoid working in extreme heat, as the binders can become too soft and sticky.
By using high-quality, textured paper and working in thin, buildable layers, you maintain control over the final result. Patience is the most critical element in mastering this versatile medium.
Key facts
- Oil pastels contain non-drying oil and wax binders, meaning they never fully harden like oil paint.
- Use a colorless blender stick, which is essentially a wax-based medium without pigment, to smooth transitions.
- Apply pressure to your strokes; heavy pressure creates opaque layers, while light pressure allows for subtle color mixing.
- Use a palette knife or a metal scraper to physically push and blend thick impasto layers of pastel.
- Mineral spirits or turpentine can be applied with a brush to dissolve the binder and create a wash-like effect.
- Work from light colors to dark colors to prevent muddying your lighter pigments during the blending process.
The bottom line
Blending oil pastels is a versatile process that relies on the medium's inherent softness and wax-based composition. By experimenting with tools like blending stumps, solvents, or simple finger pressure, you can achieve everything from smooth gradients to textured impasto effects. Always remember to layer light colors first and avoid excessive mixing to maintain vibrancy, ensuring your final piece remains clean, professional, and visually compelling.
People also ask
Can you blend oil pastels with your fingers?
Yes, using your fingers is a common technique that allows for direct control and warmth to soften the wax. However, be aware that skin oils can sometimes affect the long-term archival quality of the artwork.
What is the best paper surface for oil pastels?
Textured paper, such as sanded pastel paper or heavy-weight watercolor paper, works best because the "tooth" grabs the pigment. Smooth surfaces make it difficult for the pastel to adhere, leading to smearing rather than blending.
How do you prevent colors from becoming muddy?
Avoid over-blending by limiting the number of strokes once the colors begin to merge. If you mix too many complementary colors, such as red and green, they will turn into a dull brown or gray.
Can I use baby oil to blend oil pastels?
Yes, a small amount of baby oil on a cotton swab or brush effectively thins the pastel for a painterly look. Use it sparingly, as too much liquid can soak through the paper and create oily halos.
Are oil pastels the same as oil sticks?
No, oil sticks are essentially oil paint in stick form and contain drying oils that eventually cure. Oil pastels remain permanently soft and require a fixative or glass framing to protect the surface.
How do I clean my tools after blending?
If you use solvents like mineral spirits, clean your brushes immediately with soap and water. For tools like palette knives, a simple wipe with a paper towel or a dab of vegetable oil will remove the wax residue.
This answer was created with the help of AI research tools and reference sources. Spotted an error? Let us know — we correct mistakes quickly. See our editorial policy.